Sample of my flash movie tutorials!
How to create a new MS Access 2003 database
How to open an MS Access 2003 database
How to load MS Access 2003 database
Saturday, March 21, 2009
Thursday, March 19, 2009
Using MS Access Queries to retrieve and display data
Using SQL VIEW or DESIGN VIEW to display, delete, update or insert data.
a.1 SELECT statement
Selecting All Columns
SQL script: Type the sql script in the SQL view of a query as in the
lines below.
Select * from tablename
--- or ---
Go to query design view as shown below.
Microsoft Access Design View:
1. Drag the asterisk of the selected table in the table or query area to
the design grid. Click Run button or View button.
See picture below.
a.
a.1 SELECT statement
Selecting All Columns
SQL script: Type the sql script in the SQL view of a query as in the
lines below.
Select * from tablename
--- or ---
Go to query design view as shown below.
Microsoft Access Design View:
1. Drag the asterisk of the selected table in the table or query area to
the design grid. Click Run button or View button.
See picture below.

Selecting Columns and Changing Column sequence
SQL script: Type the sql script in the SQL view of a query.
Select columname, columname, columname from tablename
Microsoft Access Design View:
1. Drag the column names of the selected table in the table or query area to the design grid according to your preferred sequence. Click Run button or View button.
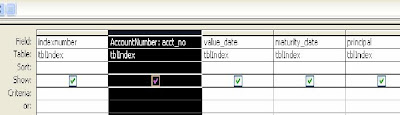
Manipulating Column Names
Select columname as name, columname as name from tablename
In design view:
Change the name of the column by typing the preffered name before the column name as in the example: Accountnumber: acct_no
Accountnumber is the preffered name
acct_no is the fieldname or column name in the database

a.
Tuesday, March 17, 2009
Create an MS Access table from scratch
Introducing you to Access data types:
Text
Date/Time
Use for dates and times. Stores 8 bytes.
Currency
Use for currency values and to prevent rounding off during calculations. Stores 8 bytes.
AutoNumber
Use for unique sequential (incrementing by 1) or random numbers that are automatically inserted when a record is added. Stores 4 bytes; stores 16 bytes for Replication ID (GUID).
Yes/No
Use for data that can be only one of two possible values, such as Yes/No, True/False, On/Off. Null values are not allowed. Stores 1 bit.
OLE Object
Use for OLE objects (such as Microsoft Word documents, Microsoft Excel spreadsheets, pictures, sounds, or other binary data) that were created in other programs using the OLE protocol. Stores up to 1 gigabyte (limited by disk space).
Hyperlink
Use for hyperlinks. A hyperlink can be a UNC path or a URL.
Stores up to 2048 characters.
Lookup Wizard
Use to create a field that allows you to choose a value from another table or from a list of values using a combo box—-choosing this option in the data type list starts a wizard to define this for you.
Requires the same storage size as the Primary Key that corresponds to the Lookup field ---- typically 4 bytes.
Steps in Creating a Table in Design View
1.Click the table tab in the Groups menu bar.
2.Click “New” in the Toolbar pane to load the New Table dialog box.
3.The New Table dialog box choices are the following: Datasheet View, Design View, Table Wizard, Import Table and Link Table.
4.Choose “Design View” and click “OK”.
5.In the Design View, the user specify the field name and data type of the field.
Exercise in creating a table:
Table Name: DisbVoucher
Fields/Attributes:
DVNumber (number, primary key, length=user defined)
PayeeName (text, length = 60)
Particulars (memo)
Table Name: DVDetails
Fields/Attributes:
DVEntryID (number, primary key, length=user defined)
DVNumber (Lookup to DVNumber field of DisbVoucher table)
Debit (currency, decimal=2, format=standard)
Credit (currency, decimal=2, format=standard)
Linking your tables or creating relationships
Lookup Wizard – creates a field limited to a list of values based on other fields from other tables or you can type the valid values.
Using the Lookup Wizard:
1. Choose the Lookup Wizard from the data type choices.
2. Choose to Lookup from other tables or queries or choose to type the valid values.
3. If you choose to Lookup from other tables or queries, choose from among available queries or tables presented by Access.
Using the Relationships Window
1. Click the Tables tab in the Group menu bar.
2. Click “Relationships” to load the table relationships which looks like the one one shown below.

Text
Use for text or combinations of text and numbers, such as addresses, or for numbers that do not require calculations, such as phone numbers, part numbers, or postal codes.
Stores up to 255 characters. The FieldSize property controls the maximum number of characters that can be entered.
Memo
Use for lengthy text and numbers, such as notes or descriptions.
Stores up to 63,999 characters.
Use for data to be included in mathematical calculations, except calculations involving money (use Currency type).
Stores 1, 2, 4, or 8 bytes; stores 16 bytes for Replication ID (GUID). The FieldSize property defines the specific Number type.
Date/Time
Use for dates and times. Stores 8 bytes.
Currency
Use for currency values and to prevent rounding off during calculations. Stores 8 bytes.
AutoNumber
Use for unique sequential (incrementing by 1) or random numbers that are automatically inserted when a record is added. Stores 4 bytes; stores 16 bytes for Replication ID (GUID).
Yes/No
Use for data that can be only one of two possible values, such as Yes/No, True/False, On/Off. Null values are not allowed. Stores 1 bit.
OLE Object
Use for OLE objects (such as Microsoft Word documents, Microsoft Excel spreadsheets, pictures, sounds, or other binary data) that were created in other programs using the OLE protocol. Stores up to 1 gigabyte (limited by disk space).
Hyperlink
Use for hyperlinks. A hyperlink can be a UNC path or a URL.
Stores up to 2048 characters.
Lookup Wizard
Use to create a field that allows you to choose a value from another table or from a list of values using a combo box—-choosing this option in the data type list starts a wizard to define this for you.
Requires the same storage size as the Primary Key that corresponds to the Lookup field ---- typically 4 bytes.
Steps in Creating a Table in Design View
1.Click the table tab in the Groups menu bar.
2.Click “New” in the Toolbar pane to load the New Table dialog box.
3.The New Table dialog box choices are the following: Datasheet View, Design View, Table Wizard, Import Table and Link Table.
4.Choose “Design View” and click “OK”.
5.In the Design View, the user specify the field name and data type of the field.
Exercise in creating a table:
Table Name: DisbVoucher
Fields/Attributes:
DVNumber (number, primary key, length=user defined)
PayeeName (text, length = 60)
Particulars (memo)
Table Name: DVDetails
Fields/Attributes:
DVEntryID (number, primary key, length=user defined)
DVNumber (Lookup to DVNumber field of DisbVoucher table)
Debit (currency, decimal=2, format=standard)
Credit (currency, decimal=2, format=standard)
Linking your tables or creating relationships
Lookup Wizard – creates a field limited to a list of values based on other fields from other tables or you can type the valid values.
Using the Lookup Wizard:
1. Choose the Lookup Wizard from the data type choices.
2. Choose to Lookup from other tables or queries or choose to type the valid values.
3. If you choose to Lookup from other tables or queries, choose from among available queries or tables presented by Access.
Using the Relationships Window
1. Click the Tables tab in the Group menu bar.
2. Click “Relationships” to load the table relationships which looks like the one one shown below.

Subscribe to:
Posts (Atom)